
We're back with a new edition to the Gelli Plate series. First, we made simple backgrounds, then we used masks, and last week we used texture. This week we'll be using stencils.

I know you can just dab paint through a stencil straight onto your project, but let me show you how fun it is using a Gelli Plate.
SUPPLIES:

- Gelli Arts Plate (I'm using the 6"x6" plate)
- Assorted Acrylic Paint (I'm using Dina Wakley Media Paint, Night)
- Brayer
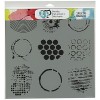
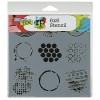
- Assorted Stencils (I'm using Crafter's Workshop 12"x12" Ronda Palazzari Well Rounded, 6"x6" is also shown... it's my fave so I have both sizes)
- Paper (I'm using scrapbook paper, but you can use any kind of paper)
- Sponge (I'm using a make-up sponge)
- Craft Mat or Palette Paper

HOW TO
This is just another simple, few step tutorial, but adding this extra layer to my cards really makes me happy!STEP ONE: dab out a little bit of paint onto your craft mat or palette paper

STEP TWO: dab your sponge into the paint, and dab off any excess blobs

STEP THREE: place your stencil over the Gelli Plate
STEP FOUR: dab the painty make-up sponge over the stencil

STEP FIVE: Lift off your stencil

STEP SIX: place your paper over the Gelli Plate and rub it into the plate to pick up the stenciled paint.

STEP SEVEN: Lift off your paper and VIOLA!!!

Repeat the steps over and over again adding one or multiple stencils onto your plate before picking up the print. I think my favorite is the bottom right, YUM!

Next week, we'll be adding more onto the 4"x6" cards and concluding this series. I'll be sure to use these in my layout showcasing Thanksgiving week. I can't wait, to finish these cards up and use them! Then we'll be on to doing some fun mixed media Christmas projects!
View blog post for supplies
Disclosure: This post contains affiliate links. I will receive a small commission on purchases made, using my link. Thank you for your continued support in keeping this blog running and to help purchase supplies for the tutorials and inspiration!


Another appealing explanation is the low obstructions to section. With low start-up expenses and a lot of online assets (like this one!) to quickly diminish the learning fix, anybody can dispatch an independent social administration business inside a short space of time. German transcription
ReplyDeleteEach post on your blog is a treasure chest of wisdom. It's like diving into a sea of knowledge and coming up with pearls.Dismiss Order Of Protection New Jersey
ReplyDeleteWow, this mixed-media tutorial using Gelli plates and stencils is super inspiring! I love how you break down each step—it makes experimenting with textures and layers so approachable. Speaking of taking creative risks, I’ve been exploring ways to make learning easier, too. If anyone struggles with algebra, I highly recommend take my Algebra class for me from Take My Online Class. It’s a lifesaver for staying on top of coursework while still having time for fun projects like this.
ReplyDelete