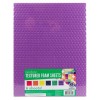
I'm back with another edition of the Gelli Plate tutorials. We first made simple backgrounds, then we used masks to make fun designs. Today we're going to dive into using texture. This is lots of fun and I have you tell you that you can do so much more than what I'm showing you with these textures I found in the kids' craft section at Walmart.
I was browsing Facebook one day and someone in one of the groups I'm in, found these really cool foam texture sheets at Walmart. I had to go grab them right away and I'm so in LOVE with them!!! I use them not just on my Gelli Plate, but also use them as stamps on my canvases and in my art journals. The are so cheap and seriously a MUST-HAVE!!!
SUPPLIES:
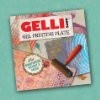
- Gelli Plate (I'm using the 6"x6" square)
- Craft Mat
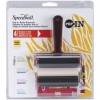
- Brayer
- Paper (I also use deli paper for rolling off excess paint and printing)
- Acyrlic Paint (I'm using Liquitex BASICS in Titanium White)
- Textured Items (I'm using the foam textures I got at Wal-Mart)
You can even make your own using the non-brush end of a paint brush and styrofoam, etching in your own designs. You can also heat up some foam sheets put it in an embossing folder and press firmly together, or send through your manual die cutting machine.
Disclosure: This post contains affiliate links. I will receive a small commission on purchases made, using my link. Thank you for your continued support in keeping this blog running and to help purchase supplies for the tutorials and inspiration!
HOW TO:
So, let's get started on this super easy and fun tutorial!
STEP ONE: add a dab of paint to your gelli plate, just like we've done for the past two tutorials.
STEP TWO: using the brayer, spread it out... just like we've done with the past two tutorials.
STEP THREE: press the texture into the paint and lift off... like you're stamping it onto the paint
STEP FOUR: add your paper down and press into it... I use just one card and put a piece of deli paper on top avoid the mess on my hands and also to print on deli paper to use later.
Pull up and VIOLA!!! You can now see the yummy texture on your paper and still see the original background through it.
MORE THAN ONE TEXTURE
This is the really fun part. You don't need to stick to one texture. Using my hand for pressure, I just stamped on bits here and there all over the plate until I've covered the whole area.First dots, then grid in the corners...
then hexagons...
then the swirls...
then the chevron...
Here are my finished cards. Well, not technically, I'm saving them for the next tutorial. I love the added texture to the cards!


0 comments:
Post a Comment