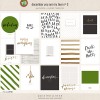
Every day I'm spending a little bit of time going through the photos from the day before and picking one or two photos to use in my December Album. The rest of the photos will go in my regular Project Life album.
The templates I'm using have a plain white background, so I needed an easy way to figure out where to trim without having to do any math. So, I've put together a quick tutorial in addition to sharing my pages.
I will mostly mix in the pages I've already cut within the daily pages. I want it to be simple and not as much work to keep up this year. I have a lot on my plate this month, so simple and easy is the way I'm going this year.
Here's my pages so far. I always like to have a little manifesto in the front and then Day One on the next page.
So, as I was printing these pages up, I was thinking about how to trim the page when the page is white and you can't see the edge. I could do the math and try to figure out how much I need to trim from each side, but I have a much easier way.
HOW TO CREATE A BORDER FOR TRIMMING
My page/template is 6"x8" and I'm printing them on 8.5"x11" paper. The background to my template is white. Since I wouldn't be able to see the border, I needed a simple solution for printing. It was easy actually.- STEP ONE: Click on the background layer, and drag the little "lock" into the trash bin right below the "lock" icon. This allows you to edit that background layer.
- STEP TWO: Edit > Stroke in the top menu bar, and a window will pop up
- STEP THREE: change the Width to 1px, and the color to a light gray (you can go lighter than what I did)
- STEP FOUR: make sure the location is either inner or center... you won't be able to see the stroke if you choose outer. I just leave the blending section at it's default, normal, 100%, preserve transparency unchecked
- STEP FIVE: click OK and print your page
Disclosure: This post contains affiliate links. I will receive a small commission on purchases made, using my link. Thank you for your continued support in keeping this blog running and to help purchase supplies for the tutorials and inspiration!


0 comments:
Post a Comment