I don't know about you, but now that the holiday season is coming up, I want everything to be gold or a warm metallic. I seriously can't stop myself from adding gold to everything or preparing journal cards for this year's December Daily.
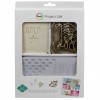
When the Heidi Swapp Project Life® line came out at Michaels, I just had to have the Color Magic Value Kit for the watercolor paper and the yummy canvas and wood veneer words. Of course, I LOVE the color magic cards too.
The first thing I thought when I saw the "GOLD (star)" card was how awesome it would be to make it gold and to use it as a stencil too. I did just that and here's a quick and simple tutorial on how I created these two cards.
- STEP ONE: Using your palette knife, scoop out a little bit of the gold modeling cream.
- STEP TWO: Spread it over the cut out journaling card that I'm using as a stencil onto the card underneath. I wanted a little bit of texture so I didn't smooth it out and tapped it after filling the stencil completely in.
- STEP THREE: Separate the cards.
- STEP FOUR: Spray/mist Heidi Swapp Color Shine over them in Mustard and Gold. Blot them with a paper towel and spray again until you're happy. The patterned card I only misted with gold. I love the added texture from the paper towel when I blot it.
Disclosure: This post contains affiliate links. I will receive a small commission on purchases made, using my link. Thank you for your continued support in keeping this blog running and to help purchase supplies for the tutorials and inspiration!


0 comments:
Post a Comment